Thursday, 11 October 2018

Tips for Painting Wooden Letters - Personalised Wall Letters DIY Craft!


Home decor wooden letters can spell out baby names on the wall of a nursery, form a  monogram or accent custom wreaths. These letters come in a wide variety of sizes you can buy painted and finished or opt for raw wood letters from your local arts and crafts supply store. For a one-of-a-kind custom look, decorate them by hand to coordinate them with your existing decor.
Things You'll Need

  • 220-grit sandpaper
  • Tack cloth
  • Paintbrushes
  • Primer
  • Spray paint or acrylic hand paints
  • Sealant
  • Painter's tape
  • Stencils
  • Pencil
  • Thumb tacks
  • Scrap cardboard or an old box


Prepping the Letters
Raw wooden letters are sometimes a little bit rough. Lightly sand them with fine-grit sandpaper working in the direction of the wood grain. Run your fingers along the sanded surface occasionally to test for smoothness. Once the wood is smooth, wipe off the dust with a tack cloth.
Prepare the wooden letter for painting by covering it with a primer coat on all its paintable surfaces. If you avoid this step, your finished letters might have a blotchy paint appearance because of how some woods soak up the paint.
The Paint Choice
You can choose to spray paint the wooden letters or paint them by hand. Acrylic spray paints provide an excellent base coat on which you can paint artistic details by hand. Depending upon what you envision for your finished look, there are many different paint options from which to choose.
Spray Paint

Spray paint is available in many different colors and comes in can with a spray nozzle. If you want a solid color for your letter, this is a fast and effective way to get even coverage.

Warning
If you elect spray paint, follow manufacturer instructions. Paint outside or in a well-ventilated area and wear a face mask. For best results, paint in temperatures that range from 50 to 90 degrees Fahrenheit.

Acrylic Paint

Acrylic paint comes in small paint bottles or tubes in virtually any color imaginable. Embellish your wooden letters with your own hand-painted designs or use painter's tape and stencils. Match your acrylic paint to bedding, textiles, or other elements of your room design. When you know how to mix paint colors using the artist's color wheel, you can easily create a close enough match.
If working freehand, draw your design onto the letter with pencil prior to painting.

Painting Wooden Letters
Step 1
Push thumb tacks into the back of your letter every 6 inches or so. When you place the letter down on top of the table it will be elevated slightly so you can paint the top and sides of the letter. Cover the table with cardboard, plastic sheeting or a dropcloth to protect it as you paint.
Step 2
Apply the base coat either by spray-painting or hand-painting the letters. Cover the entire surface evenly. Allow the base coat to dry, from 20 minutes to an hour before applying a second coat, based on the specific paint's drying times.
Step 3
Embellish each letter with the chosen designs. For stripes, tape the letter using painter's tape in equal dimensions the size of the stripe. You can also use a stencil brush or a foam pouncer as an alternative for adding shapes, if you do not have freehand drawing skills.
Step 4
Paint the individual designs onto the letters and allow the paint to dry overnight before applying a sealant finish.
Step 5
Apply a spray sealant or other protective finish by hand to your completed letters.

Tip
Spray paint the letters using a consistent horizontal motion. Spray on multiple light coats to avoid runs.  Clean the nozzle of the spray can by holding it upside down and depressing the nozzle for 5 seconds.


How to Sew a Baby Quilt - Create a Baby Clothes Patchwork Quilt


If you’re looking to make a special gift, or are awaiting a new arrival soon, this baby quilt is a fantastic project to get you started with quilting!  Why not take this design from Hobbycraft Blog a step further and use fabric squares from your baby's own clothes to make the quilt, creating a gorgeous personalised keepsake to cherish forever. 

For the basic Quilt design;  

You Will Need
  • 2 Charm packs 
  • Bias binding 
  • Cotton wadding 
  • Backing fabric – available in store

Craft Essentials

  • Pins 
  • Cutting tools 
  • Sewing machine 

How to Make

1. Lay out the charm pack squares to make a design and size you like.
2. Cut out a shape from some spare squares or backing fabric to applique on the design.
3. Sew the shapes onto their squares.
4. Sew the squares right sides together by row, using a ¼ inch seam allowance.
5. Press the seams open.
6. Sew the rows with right sides together using a ¼ inch seam allowance.
7. When the quilt top has been assembled, press all seams.
8. Lay out the backing fabric and wadding on a flat surface.
9. Place the quilt top, right side up and pin through all 3 layers.
10. Make sure the quilt sandwich is secure and cut to the size of the quilt top.
11. Sew the layers together, stitching in the seams where the squares are joined.
12. Cut enough binding to reach around all 4 quilt sides.
13. Unfold the bias binding and pin to the reverse side of the quilt, matching the edges.
14. Sew the binding to the quilt, stitching as close to the edge as possible.
15. Fold the bias binding over the quilt edge to the front side.
16. Sew to the front, stitching close to the inside edge of the binding. Make sure to catch the binding on the reverse side in the stitching.


Wednesday, 10 October 2018

15 Lovely Ideas for Baby Shower Gifts - Handmade DIY


  • A couple of soft towels can turn into a sweet lollipop if you wrap them around one another in a shape of a swirl and stick a plastic spoon to the back of the composition. 
  • A diaper cake is a fantastic classic idea for a baby shower. Make three layers of a cake using our DIY tutorial. Add some creativity with cute ribbons and sweet toys of a matching color. 
  • Another cool and unique idea is making cupcakes out of...baby clothes! 
  • You can also arrange tiny cute socks in a shape of flowers and make a whole bouquet! It's beautiful and very cute. You can also make beautiful roses out of towels. You can make a bouquet and also may use them as little additions to the main gift.
  • You can make an emergency traveling case out of a large wet wipes dispenser.

Monday, 8 October 2018

Baby Shoes Shadowbox - DIY Personalised Keepsake Shadow Box 3d Frame


A great way to treasure your child's first pair of shoes, courtesy of Daddycandoit!  
https://daddycandoit.wordpress.com/2011/01/02/baby-shoes-shadowbox/

What does one do with a pair of bronzed baby shoes?  That was my dilemma.  I wanted to preserve Julia’s first pair of shoes, but I wanted to do it in a way that wouldn’t actually destroy the shoes.  Sure, bronzing them would preserve them forever, but it would also take away the color and some of the details in the shoes that make them special.
I decided to mount Julia’s first pair of shoes in a shadowbox.  This way, the shoes are not only preserved, but also could be worn again by her child if she so chooses . . . plus, they make a fairly attractive display item that we can enjoy every day.
First, I gathered my supplies:
1 shadowbox with a 12×16 interior space
1 can of black spray paint
1 piece of mat board
1 sheet of handmade 20×30 paper
chipboard letters to spell out Julia’s name
1 sheet of 20×20 black cardstock
Julia’s baby shoes
1.  Finding an appropriate shadowbox turned out to be quite an adventure.  It had to be large enough to hold Julia’s shoes in length and width, but also in-depth.  After measuring the height of one of the shoes, I figured I needed a shadowbox that is 2 1/2″ deep.  I also preferred a wooden frame in black so that it would match the rest of the frames in our house.  I was unable to find a shadowbox that fit all my criteria.  So, I improvised!  I found one that had all the right dimensions, but was silver (this is where the spray paint comes in!).  I took the glass off the shadowbox and removed the back and then spray painted everything black – including the small strips of wood that hold the glass in place from behind.
2.  Since the inside of the shadowbox is not a standard mat size, I was unable to find a pre-cut one.  So, I bought a sheet of artist’s board, cut it to size, and then cut an opening in the center of it.  The finished mat is 2″ wide on all sides. 
3.  To give the mat a nicer finish, I decided to wrap it in handmade paper.  The design in the paper doesn’t show up well in the photo, but it’s a cream-colored paper with little silver silk threads running through it.  I found this paper at Hobby Lobby in the pre-cut mat section – it’s actually intended for wrapping mats.  I taped the mat I had made to the wrong side of the paper and then cut slits in the paper from one corner to its opposite, making an “X” inside the mat opening.  Then, I pulled the paper tight around the mat and held it in place using double-sided tape.  Essentially, I wrapped the mat the same way you would upholster a seat cushion or wrap a present.
4.  To create more depth in the shadow box, I then cut strips of black foam core (the kind that is black in the center as well) and adhered them around the outside perimeter on the backside of the wrapped mat.  This way, once the mat was adhered to the back of the shadowbox, it would look as if it is suspended above the backing.
5  Next, I covered the backing of the shadowbox with the black cardstock using double-sided tape.
6.  At this point, all that was left was to adhere the letters of Julia’s name and her shoes to the backing of the shadowbox.  I used double-sided tape to hold the letters on and since the shoes are relatively heavy, I used a double-sided foam tape to hold those on.  Then I just popped the glass back in the frame, slid the backing into position, and it was ready to be hung or sit handsomely on a shelf.


DIY Newborn Shadow Boxes – a Memorable DIY

This is a great design idea for a baby keepsake frame from Aimee, at The Crazy Craft Lady. A simple and effective design - perfect for displaying and treasuring those special keepsakes and moments. 

https://thecrazycraftlady.com/newborn-shadow-boxes-for-the-twins/

You won’t believe how easy it is to make the perfect customized newborn shadow box.  Learn how to make a personalized baby shadow box with a few basic supplies and keepsakes

You won't believe how easy it is to make the perfect customized newborn shadow box.  Learn how to make a personalized baby shadow box with a few basic supplies and keepsakes!Sae
 
I have seen some pretty creative newborn shadow box ideas lately, and knew this was something I wanted to do with our twins.  There is a little corner in the hallway outside their bedroom; I felt like this would be a perfect place to display some newborn mementos.
Enter my decision to make two newborn shadow boxes with all of our keepsakes from the hospital.

Here’s what I kept:
  • Hospital hat and kimono top (the ones given to us by the hospital)
  • The footprints from their “souvenir birth certificates”
  • Ankle bracelet identification tags – I used two in Miss. B’s shadow box, since the back of hers had a stamp that reads “twin #2”
  • The identification card from the hospital bassinet
  • The socks the babies wore home from the hospital (so small!)
  • A photo from the night they were born – I edited the pictures and reduced the color saturation level by about 50%


I bought two shadow boxes from Michaels during a BOGO sale as well as pink & blue scrapbook paper and two little wooden letters – R and B.  

I painted the letters pink and blue to match the paper I would be mounting some of my keepsakes on.

First, I arranged everything on the back board – walking away and coming back with fresh eyes to make sure I liked the positioning of all my items.  I decided to do a mirror image of my first arrangement in the second shadow box.  This way the boxes are not too similar.

I displayed my two newborn shadow boxes outside the nursery.  This was for several reasons.  One: I’m not a big fan of hanging newborn pictures in the nursery itself.  I think the nursery should be a room for the babies to grow in, explore, and enjoy.  Two: I wanted to keep the shadow boxes close to the nursery as a reminder of how much they have grown and changed.  Three: The corner just outside the nursery was pretty empty looking.

My sister gave us a collage frame filled with newborn and baptism pictures, which I decided to hang on the opposite wall from the shadow boxes.  I love this project, and constantly find myself looking over at the keepsakes and telling myself I can’t believe just how tiny they were, and how blessed we are to have two happy and healthy babies in our lives.

How to Make Baby Handprints Footprints - Quick & Easy DIY Baby Keepsake!!

Sunday, 7 October 2018

Personalised Free Standing Letters - Photo Collage Keepsake Wall Art


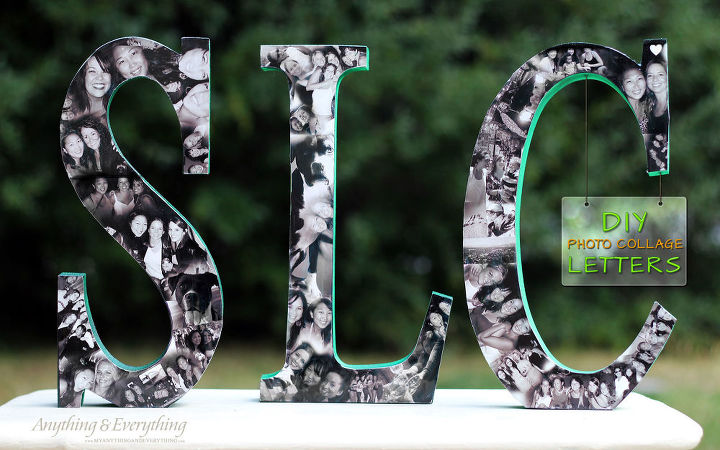
Lovely idea, whether it's a gift for someone else or a keepsake for your home. Create a collage of photos on a single free standing wooden letter or create a name and use it as a name plaque for a bedroom or other wall art in the home. This can be done easily and at low - follow the steps below courtesy of Tara, from Anything & Everything.  


A few weekends ago was spent celebrating with my friend that will be moving away to San Diego. So today I am sharing this personalized gift that a friend and I made for her. We wanted to make something that represented SLC and also all the fun times we had together with our group of girlfriends. So being that we live in Salt Lake City, we decided to get some wood blocks that say SLC and put a photo

diy photo collage letters, crafts, decoupage, diy

diy photo collage letters, crafts, decoupage, diy


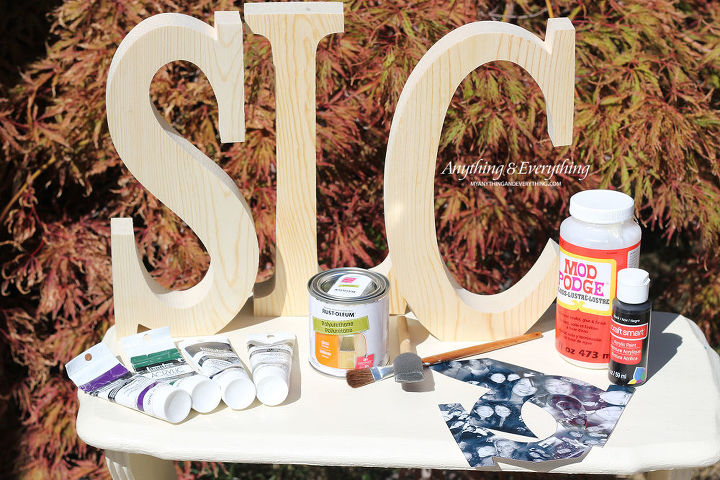
Supplies:

Wood block letters
Paint
Sponge brush
Paint brush
Pictures
Mod podge
Polyurethane


I started off by painting the front of the wood letters black. Knowing that it would be hard to print my photos to match the letters exactly, I painted them black to help hide any seams and mismatches.


diy photo collage letters, crafts, decoupage, diy


Once the black paint was dry, then I painted the rest of the wood a pretty emerald-green color. I had such a hard time deciding which color to use, but I am happy with how this color turned out!


diy photo collage letters, crafts, decoupage, diy


Now it's time to apply the pictures. Luckily I have a very talented husband who was able to put all the images together for me in a collage using photoshop, so I only had to make a few cuts. If you are unable to do this, you can easily still create the same look just by printing out your pictures individually and cutting them to fit how you like. Apply mod podge to the wood and then place the images on top, so it will be glued on to the wood. Let dry. Then using an X-Acto knife, I trimmed the edges of the pictures that were hanging over the wood.


diy photo collage letters, crafts, decoupage, diy


After you have applied all the images to the wood with mod podge and it is completely dry, use a sponge brush and apply a thin coat of polyurethane over the top of the images and on all the painted wood areas.. This will help to secure the images on even stronger and it gives it a nice glossy finish to everything. When I made my DIY Wood Photo Block, I applied mod podge over the top of the image instead of the Polyurethane. I really like the polyurethane better, as I felt like the mod podge gave it a bluish tint once it dried.


diy photo collage letters, crafts, decoupage, diy

Now you have a beautiful photo collage that can be displayed anywhere!


diy photo collage letters, crafts, decoupage, diy

This would be a great gift for anyone and being that you can personalize it anyway you would like makes it even more special.

How to Make a Baby Keepsake Shadow Box Frame

Here's a little bit of inspiration for those wanting to frame some of your special baby keepsakes. It's a shame to hide them away in a box in the loft, when they can make such a beautiful and meaningful display in your home.


Saturday, 6 October 2018

How to Paint Indoor Wooden Letters - Wooden Wall Letters & Name Plaques

How to Decorate Wooden Letters for Name Plaques, Handmade Gifts and Wall Art


Paint them, cover them in fabric, sprinkle in glitter, or wrap in ribbon, there are lots of crafty ways you can decorate wooden letters. Create headings, name plates, signs, décor for special occasions and home decorations!

I had an old frame that has been in need of a face lift for some time, so I decided to give it a spruce up with some craft paint and then sanded it for a shabby chic look, and I’ve also used craft acrylic paint to decorate some wooden letters for my nephews bedroom . . .

How to Decorate Wooden Letters #Homecraft #WoodenLetters #DIY


How to Decorate Wooden Letters / Personalised Name Letters
You will need
  • Wooden letters of your choice
  • Selection of craft acrylic paint
  • Paintbrush
How to make Wall Art You will need


  • Wooden frame
  • Wooden letters – I’ve used two X  and O letters
  • Turquoise, gold and white craft paint
  • Single paper sheet
  • Sandpaper
  • Glue Gun
How to make


  1. Start by painting your frame white and leave to dry.
  2. Meanwhile paint your letters with a layer of gold paint. Once dry, paint them turquoise and leave to set.
  3. Take your dried frame and start to sandpaper off the white paint to reveal the grey underneath to add a shabby chic look.
  4. Repeat the process with the letters until you get the desired effect.
  5. Take your chosen patterned paper and cut to size, then display in the frame – remove the glass.
  6. With your glue gun apply glue to the back of the letters and position in place.
  7. Leave to dry and then display!

1. Start by roughly sketching out your design on the letter in pencil first. I went for an animal/nature theme for my letters, but the possibilities are endless when it comes to designing your own letters.

2. Go over your design using craft acrylic. Make sure the first coat is completely dry before applying the next one, and then leave to dry. For a home decor project why not upcycle an old frame and create some unique and individual wall art for your home.


How to Decorate Wooden Letters #Homecraft #WoodenLetters #DIY